I hope you all had a terrific Thanksgiving and you are ready for Photoshop for Photographers! on Saturday Morning
Camera Raw, the Detail Panel > Input Sharpening
Camera Raw Sharpening applies some "input sharpening" even if you make no adjustments.
This sharpening ONLY applies to Raw images. ACR will ignore .jpg's and .tiff's
Sharpening has been greatly improved in Camera Raw V 6+ (V6.5 as I write this…)
As a result you should now do the majority of your sharpening in Camera Raw.
The Default ACR sharpening settings are:
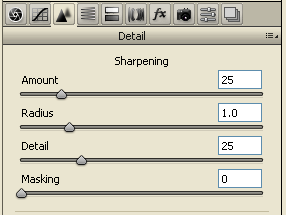
Amount: 25
Radius: 1.0
Detail: 25
Masking: 0
Remember, it's a starting point for most images.
Always evaluate your sharpening at 100%
Amount and Radius
The Amount and Radius should be adjusted together.
The Amount determines how much sharpening is applied.
The Radius lets you decide how wide you want the white edges (the halo contrast on the edges) to be.
A radius of 1.0 works for most edges.
Suggestions for Landscapes and Portraits
Fine detailed subjects will benefit from a small Radius setting < (Less than)1 (about .8)
Soft detailed portraits can use a radius > (Greater than) 1 (1.1–1.3)
Sharpening Suppression
The Detail slider
is a “halo avoidance slider,” Suppresses the sharpening effect so you don’t get sharpening artifacts and other unwanted effects from over sharpening.
You can "see" the effect detail has on the image by holding down the ALT or Option key, the sharpening is occurring in the grayscale, hence the gray display.
The larger the value the more the sharpening effect is passed through (100 % allows the total sharpening effect to happen.)
Mask
creates a grayscale mask that works exactly like a layer mask in Photoshop.
0 is no masking, and 100% is a full mask protecting as much of the photos as possible.
Set the mask high for skin and sky, lower values if you want to sharpen details. Again the ALT or Option key reveals the masking effect showing you what's being protected.
Making a Portait and Landscape presets for ACR!
Lightroom comes with presets built-in: They are in the Develop module, preset panel:
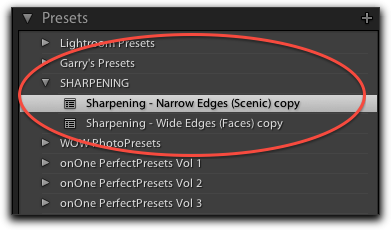
Remember, this is always a starting point…
you can make additional adjustments and save them as your own presets.
Back to Camera Raw
Here are some "standard" input sharpening settings...
ACR Presets
Portraits:
Amount 40
Set radius at 1.3
Detail 15
Mask 60
ACR Presets
Landscape:
Amount 40
Set radius at .8
Detail 35
Mask 0
You can save these settings as a preset.
Saving Preset Settings
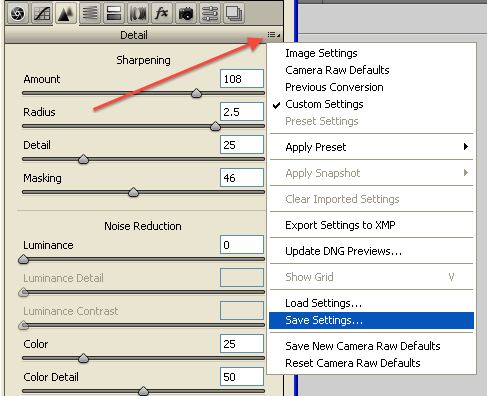
Choose from the drop down Menu: > Save Settings...
This requester will pop-up,
Choose Subset : Details
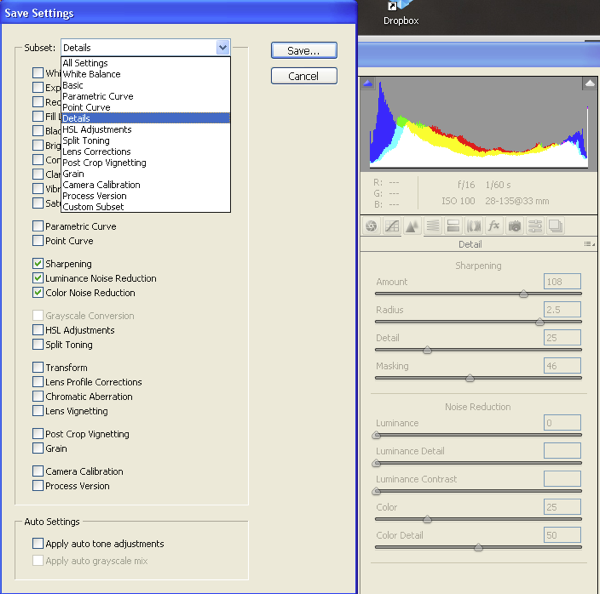
Then click on the save button, name the file…
Landscape sharpening
Portrait sharpening...
or what ever you wish.
Free Presets
OnOne software has some prepared presets that they are giving away for free.
You can download and install them, (They will want you to register first)
I discovered that when I added Set #2, In Camera Raw I could not access the sharpening presets… (There too many of presets!)
You can get the presets here
http://www.ononesoftware.com/free/
OnOne has presets for Camera Raw and Lightroom, for PC's and Macs!
Remember, as always these presets are good places to start… or experiment.
Creative Sharpening in ACR/Lightroom
For when you need to have two or more levels of sharpening in an image.
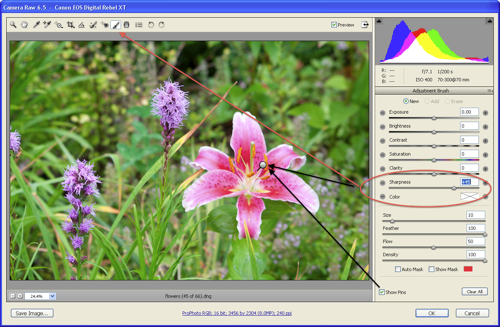
This method uses an Adjustment Brush, As you paint on the image you create a mask and apply the settings you have chosen.
In this case we are just applying sharpening. First set your sharpening using the detail panel then invoke the Adjustment brush as shown below.
Smart Object Sharpening
Using Photoshop to edit your image as a smart object processed for two levels of Sharpening.
Definitely a subject for the classroom!
No comments:
Post a Comment